Showing posts with label Polish Finish = Foil. Show all posts

Sunday, January 1, 2012

Hard Candy Blue Foil


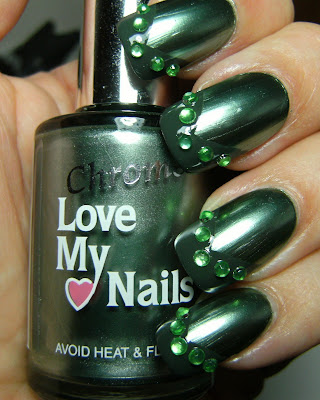
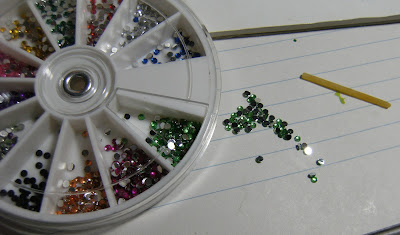
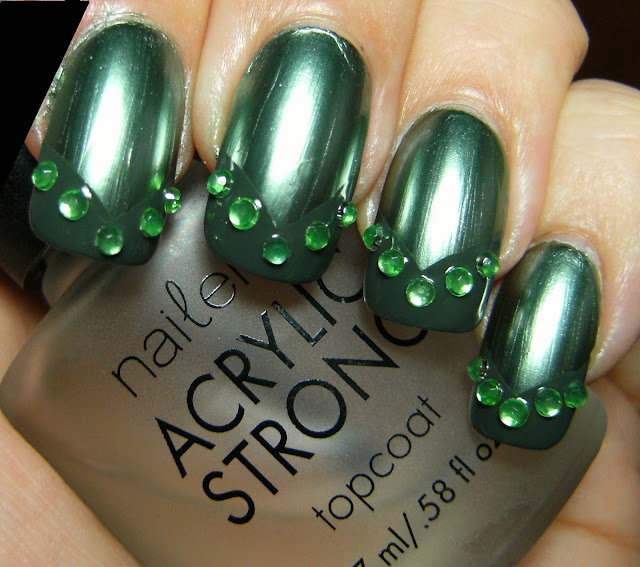
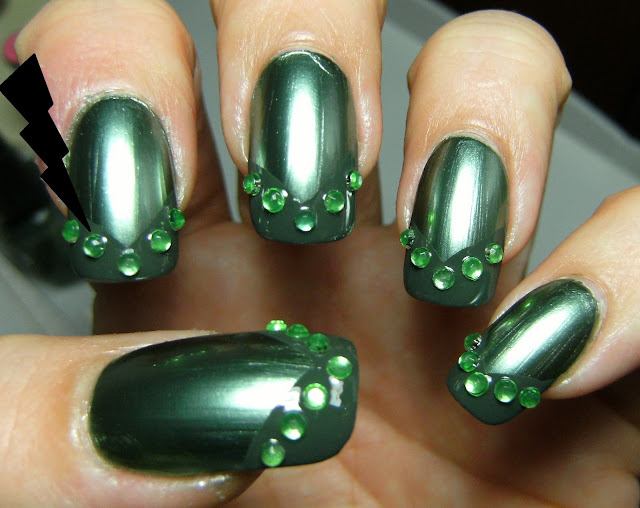
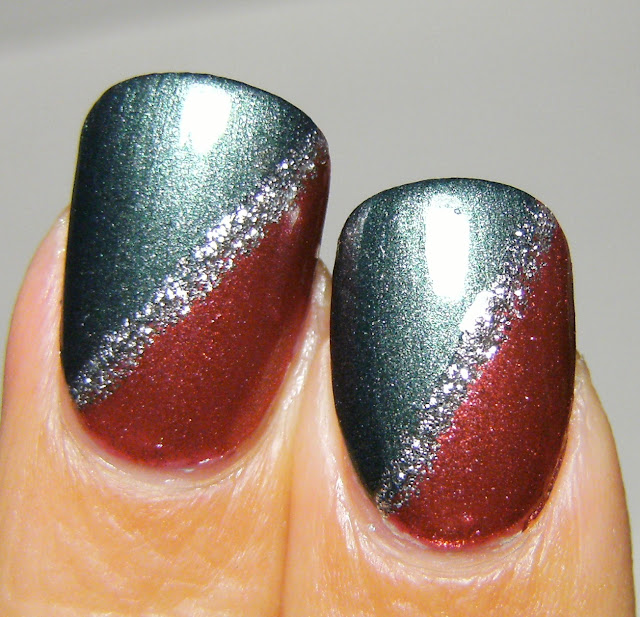
 I hope everyone had a safe and Happy New Years Eve, I stayed home, ate cheese Nacho's and watched Tosh O. - Fun times.

 I have been wearing this for 3 days now, 2 coats of Naturistic's Super Chrome Blue Spark, and 3 coats of Hard Candy Blue Foil. I didn't think these had names, but Scrangie called this Blue Foil - so I guess that's the name. This was a sheer blue jelly with lovely flakes that looks nice on it's own, but i layered it over a very similar base polish.
 

I used a matte top coat, that ended up drying to a satin finish instead of matte. The brush on this mini sucked wasn't that great, combined with the tiny brush handle, poor lighting and me standing instead of sitting I had a difficult time painting my nails....... I cant wait to have my NP room all sorted out so I can get back to normal.


Also, remember my mani from last year ( lol ) I found a comparable polish in my stash, Sally Hansen's Insta-Dri Co-Co a Go-Go. I would say that the Sally Hansen polish is the boring, plain cousin to this fabulous brown shimmery number.  I stopped in at Shoppers Drug Mart & Walmart to see if any of these polish sets were on sale but both stores were CLEANED OUT  of any Christmas-type gift sets


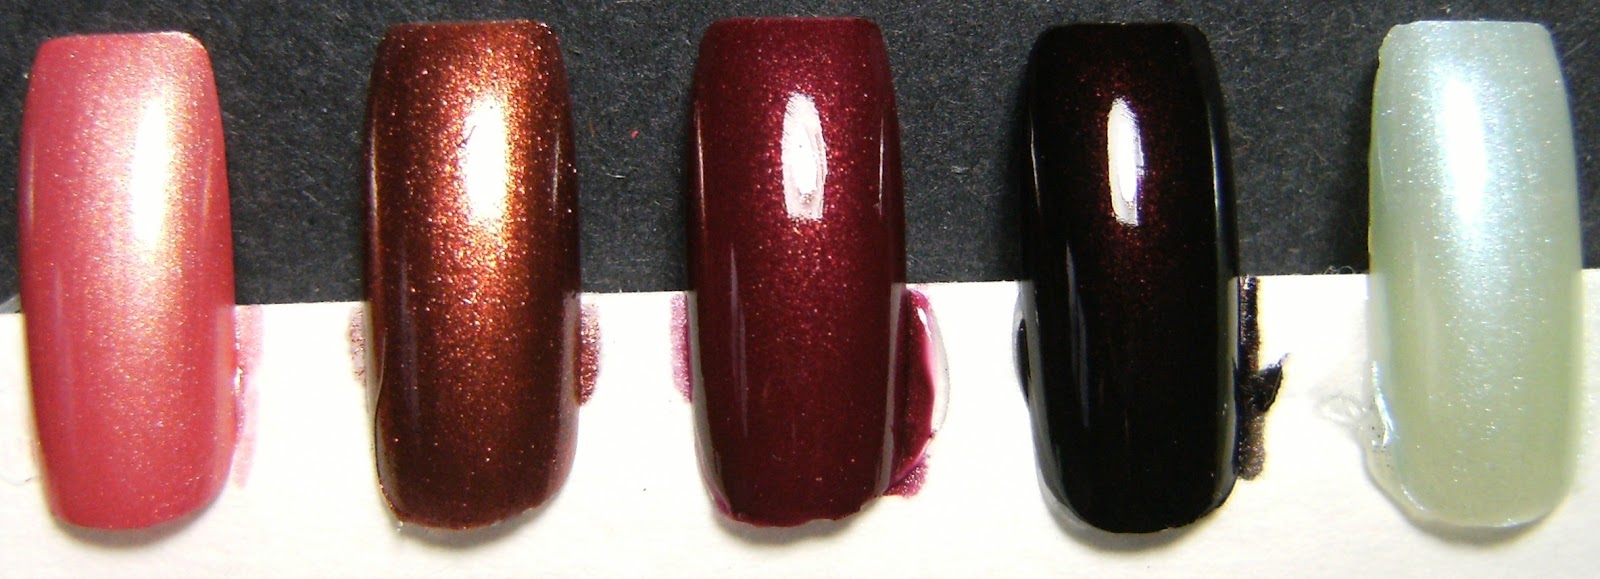
L -Color Institute Brown Shimmer, Sally Hansen Co-Co a Go-Go


L - Color Institute Brown shimmer ~ R - Sally Hansen Insta Dri Co-Co a Go-Go


 bottle shots!
o

Wednesday, December 28, 2011

Brown Foil

 This is 3 fast drying coats of a lovely brown base with copper micro flecks. I am not certain if this is a foil nail polish.... I can only tell if  a polish is a foil if when i remove it the flecks turn silver. The finish reminds me of those vinyl booth seats at old-timee diners, so what would that be classified as?

I have been wearing this for a day and a half, I am not sure what type of nail art to accompany this with because it really is stunning on its own. Does anyone else in the world have this polish? Do people usually shy away from in-expensive sets such as these? I will admit I used to, but the last 3 I have bought or been gifted have been fabulous.

I don't have any of my stash un-packed, so I cannot compare this polish or any of those posted below to anything...... And all of these weird square caps pop off to reveal  A NORMAL ROUND BRUSH HANDLE.

below no TC - I want to get into the habit of taking photos immediately after I paint my nails......

indoor fluorescent

 sun

sun

the last polish in this line u p is soooooooo cool! it is a dark purple jelly base with sapphire blue flecks


the second last polish on the right is 1 coat! It reminds me of Sinful Colors Rich in Heart.

these are from this set, not this exact one......

Wednesday, March 9, 2011

Leprechaun Chevron ( that rhymes )


My mani for today is 2 coats of Love My Nails Envy - a fabulous green chrome polish from the USA and Avon Green Olive 1 coat swiped on my nails in a chevron freehand.....I added an obscenely thick layer of Top Coat and set these fake Rhinestones from the Dollar-rama into the wet Top Coat. Applying Top Coat OVER these gems from the DollarRama will fog them up because they are plastic - there still cool though even if they get fogged over.

Chrome polish's such as this show every flaw on the nail. They tend to dry very fast, so I usually end up with serious brush strokes. They are extrememly reflective and noticeable. I was surprised with this polish, I thought it would suck but it's pretty awesome. Because they dry fast and cover well, they are good for 'underwear' = as a polish to layer over. On my list for my next USA visit is a few more of these inexpensive Love My Nails Chrome polish's - They are 2 bucks and can be found at Walmart.


@ 2 coats of Love My Nails Envy  no TC


My plastic gems from the Dollar Rama - These are not Rhinestones and will fog over if polish applied over them.... that still looks cool but I wanted some sparkle. Also; a piece of spaghetti - not cooked lol - is perfect to pick these up and place into wet polish - I lick the end of the spaghetti and then pick up the stones...

... and a few more photos

Sunday, December 5, 2010

.....now thats a Christmas Mani !


Okay I am back with a real Christmas mani. This is a very easy look using two awesome Claire's foil finish polish's. Red Slippers and Emerald city are very thick and dense polish's, they dry waaaaaaay to fast ( even for me ). But they are beautiful shades packed with foil-ey goodness.

I began with 2 coats of Red Slippers and added a coat on Nailene Acrylic Strong Top Coat. I wore this pretty polish alone for the afternoon and got bored so I went with the super-easy diagonal mani instead. I applied straight french tip guides on the diagonal and added 2 thin coats of Claire's Emerald City, I peeled off the french tip guides and traced the diagonal line with the silver glitter striping polish. I added 2 coats of Nailene Acrylic Strong Top Coat when it was all dry.

These 3 colours together are lovely Christmas shades. This is a super-easy look and looks great in any colour combination for any season. When I finished painting my nails the sun had gone down, so hopefully I will be able to get outside and snap some proper pic's tomorrow.


ugh! look at all that snow!


Claire's Red Slippers is a fabulous foil.


Below; outside in the shade and indoor Florescent


I applied Nailene Straight French Tip Guides and added 2 thin coats of Claire's Emerald City. When it was dry I removed the french Tip Guides and traced the diagonal line with the Art Deco Silver Glitter stripe polish...... when that was all dry I applied 2 thin coats of Nailene Acrylic Strong Top Coat.


L-R; Claire's Red Slippers, Emerald City, Art Deco Silver Glitter, Nailene Acrylic Strong Top Coat


all of the foils from Claire's store's are great! They are richly pigmented, shimmery and dry very fast. I think they came out in fall-time of 2009. I haven't spotted any foil polish from Claire's in the last year or so and I am glad I spotted these when I did.


 ♥


Wednesday, May 12, 2010

♥ Sally Hansen 'Blue It' with sponged Billie 'Steel Blue' ♥

Sally Hansen 'Blue It' with Billie 'Steel Blue' & Nailene Acrylic Strong Top Coat

Another fabulous Sally Hansen Extreme Wear Polish. 'Blue It' is a rich shimmery medium blue. It requires 2 to 3 coats, applies perfectly, dries fast and held up well without top coat for the afternoon. I sponged on Billie 'Steel Blue' then used a sheer sparkly franken I made to cover the entire nail. I mixed approximately 2/3 of a bottle of clear nail polish with a few drops of Billie 'Steel Blue'. I wanted to achieve a subtle silver sparkle with a teal metallic base to use as a layering polish. It is very subtle and will need some good pic's outdoors in the sun.

Sponge mani's are perfect for disguising polish flaws and tip wear. It's been a while since I have done one. I also have to add, that adding a few drops of a foil polish to a clear nail polish makes a beautiful layering polish. The sparkle is extremely subtle and can be used to save a trashed mani.

Blue Steel 3 coats with NO Top Coat


Summer is 'sorta' on the way

Stuff I used


I use ordinary kitchen sponges for my sponge manis - you can use any dense sponge. I just cut these into little squares and am sure to use a new section once one section dries out.


3 coats S.H. 'Blue It' no T.C.

Billie 'Steel Blue' sponged on

Left- with the sheer sparkly layering franken polish, Right- with just Nailene Acrylic Strong Top Coat